Reports are very important, everyone knows that. Therefore, any program should be able to create a report. Today we will try to create a simple report in the 1C program.
We will create a report using the example of our database, which we used in previous articles. Let me remind you that we have created a new database, created a Goods Arrival document, added several directories and a couple of subsystems.
And so we have the documents Arrival of the goods. We fill in the following details. Supplier i.e. the one who delivered the goods, the name of the delivered goods, quantity, price and amount. It would be nice to know who and what, as well as in what quantity delivered to us. For these purposes, you can go through all the documents, but it is much easier to open a finished report.
We create a new report in the program 1C 8
And so let's start, for starters, we will create with you a new Reports subsystem to which we will add them in the future. You can read how to create subsystems in .
Now let's move on to creating the report. Go to the configurator, look for the reports item and add a new report. We write the name of the report ReportAccording to Documents. Then go to the subsystem tab and add it to the Reports subsystem. Now click on Open Data Composition Schema.

In the window that opens, first you need to add a Dataset. To do this, click on the plus sign and select Add query dataset. Next, click on Query Builder.
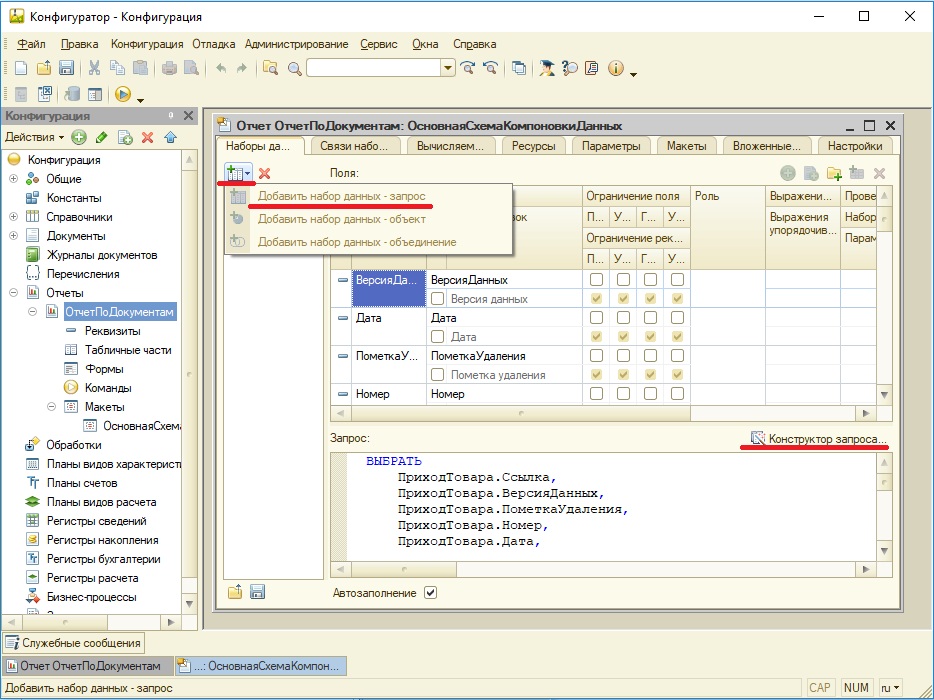
In the query constructor, in the first window, select the Goods Arrival document, since it is on it that we want to make a report. Then it should appear in the Table window. In the Field window, you need to transfer those fields that will be reflected in the report. But just in case, we transferred all the fields of the Goods receipt document. Leave the rest of the tabs untouched and click OK.

Now in the Dataset window, you need to mark the headers. Put a checkmark in front of the items Quantity, Name, Amount, Price, Supplier. If this is not done, then in the report window you will see the Materials.Price field instead of the Price field and in other fields as well.

Now go to the Settings tab and add a new grouping.

In the window that appears, leave everything as it is and click OK.

Now, from the bottom, in the Settings item, select Report and in the Selected fields tab we transfer the fields we need from the Available fields window. Namely Date, Supplier, Name, Quantity, Price and Amount.

On this, everything seems to be launching our database and looking at what happened. Go to the Reports subsystem, select our report and click generate. As a result, you should receive such a report.

From which you can find out what material, in what quantity and from whom it came. Well, that's all the simplest report is ready.