Login as a student
1C 8.3 data composition system for beginners: first report on SKD
If you have not read the introduction to this module, please read it: .
To complete the lessons you will need 1C 8.3 (not lower than 8.3.4.482) .
If you already have 1C version 8.3 installed, use it. If not, download and install the educational version, which 1C releases specifically for educational purposes.
For this:
- Unzip the archive downloaded from the link to a separate folder on your desktop:
- download link from Dropbox (option #1)
- download link from Mail.ru (option #2)
- Run the "setup.exe" file.
- Click "Next", "Next", "Install".
- Wait for the installation to finish.
A shortcut like this should appear on your desktop:
For all the lessons from this cycle, we will use the database "Gastronom" prepared by me. It completely coincides with the base that we used in the modules of the school when studying queries. Therefore, I expect you to be familiar with its manuals and documents.
If you deleted it, download it again using the next one, unpack it and add it to the list of databases.
Finally, the workplace is set up and now we will create our first report together using the data composition system. It will be very simple to demonstrate the general capabilities of the data composition system (abbreviated SKD).
We set a goal
Purpose of this lesson- create a report that, in user mode, displays a list of clients with the following fields:
- Name
- Floor
- Client's favorite color.
The report must be external. This means that it will be created and configured in the configurator, and then saved as a separate (external) file on the computer.
To generate such a report in 1C, the user will need to run the database in user mode, open this file and click the "Generate" button.
Go!
Create a report
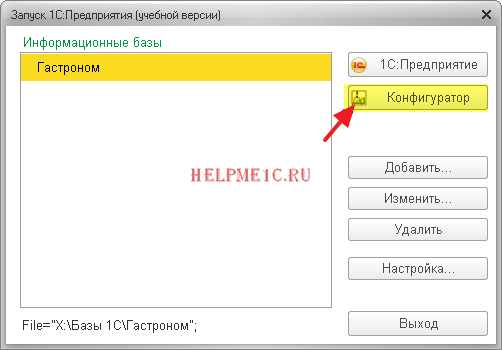
Run the configurator for the "Gastronom" database:
From the main menu, select "File"->"New...":

Select "External Report":

Create a data layout scheme inside a report
The window for creating an external report opens. Enter as the name: " Lesson 1"and then press the button" Open Data Composition Diagram":

The Schematic Creation Builder has started. Accept the default name " MainData Layout Schema"and press the button" Ready":

The main working window has opened, with many tabs and fields, in which we will configure our data composition scheme.
There is no need to be afraid - there are really a lot of opportunities here, but we do not need all of them. Especially in the first lesson.

Now we are on the tab " Datasets". We will remain on it.
Writing a query through the constructor
The Data Composition System (ACS for short) requires us to data, which it will display to the user.
The easiest way - write a request to the base. In schools, we learned how to write and understand requests - so I expect you to have the appropriate skills.
Click on green plus sign and in the drop-down list, select the item " Add Dataset - Query":


Our task is to write the request text in this field. Have you forgotten how to do it yet?
I'll prompt you:
In this query, we have selected three fields (" Name", "Floor" And " Favorite color") from table " Directory.Clients".
But do not rush to write this text in the "Request" field manually.
Now we will create the same query visually, only with the help of the mouse. This method is called Request constructor".
To call this constructor, press the button " Request constructor..." in the upper right part of the "Request" field:

In the window that opens, drag the table " Clients" from the first column to the second to indicate that it is from this table that we will query the data:

It turned out like this:

Next, let's expand the table Clients" in the second column by sign " Plus" to see all its fields and drag the field " Name" from the second column to the third to indicate that we need to query the "Name" field from this table:

It turned out like this:

Let's do the same with the fields " Floor" And " Favorite color". The result will be like this:

Click the "OK" button to exit the query builder and see that the query text is automatically added to the "Query" field.
Moreover, based on the text of the request, 1C itself pulled out the names of the fields (the area above the request) that will be used by the data composition scheme:

Now that we have made a request, the ACS knows how to get the data for the report.
Setting up the data view
Somehow left visualize this data for the user in the form of a printed form. And this is where SKD can work wonders!
To create such a miracle, go to the tab " Settings" and press the settings constructor button ( Magic wand):

In the window that opens, specify the type of report " List" and press " Further":

In the next window, select (by dragging and dropping) the fields that will need to be displayed in the list (we will drag and drop all of the available fields: " Favorite color", "Name" And " Floor"):

We get the following result and press the button " OK":

The settings constructor closed and the item " Detail records":

The report is ready, let's check it. To do this, first save the report as an external file.
Saving the report as a file
Open the main menu item File"->"Save":

I will save it to my desktop as " Lesson 1":

Checking the report in user mode
Finally, close the configurator and enter our database in user mode:
![]()
Username "Administrator", no password:

Through the menu, select the item " File"->"Open...":

And specify the report file (I saved it to the desktop under the name "Lesson1.erf":

The report form opens, press the button " Form":

Ready! Here is our printable with a list of clients, their favorite color and gender:

The printed form can be easily printed. To do this, just select the menu item " File"->"Seal...":

Just like that, without programming, we managed to create a full-fledged report that users can open in their databases, generate and print.
students - I answer by mail, but first take a look at.
Login as a student
Sign in as a student to access school content