To perform shallow strip foundation(MZLF) on heaving soils, it will be necessary to provide for a set of protective measures. This technology is relevant for buildings that do not plan to arrange a basement. The construction of deep foundations in this case will lead to unreasonable cost overruns.
Soil heaving is a natural phenomenon that occurs with the simultaneous presence of two factors:
- temperature below 0°C;
- moisture.
Water is a unique substance. It is the only one of all matter on the planet that expands upon cooling (the density of fresh water is approximately 1000 g/m3, and the density of ice is 917 g/m3). In the presence of moisture in the soil in winter, an increase in soil volume occurs. In this case, stresses arise that try to push the foundation out of the ground.
Uniform deformations are not so dangerous for the building, but they are not the same during heaving. In the middle of the house, the soil temperature is higher, the forces of frost heaving are weaker here. At the edges of the building, they are strong, since the heating from the interior is less. The outer walls of the house rise more than the inner ones, which leads to the appearance of cracks in the foundations, walls, partitions.

The action of the forces of frost heaving.
What soils are heaving
Before designing and building a foundation, it is necessary to carry out geological surveys. They will help determine which layers of soil lie on the site. If it is not possible to order a professional study, you can conduct it yourself by extracting pits or by hand drilling. When determining the type of soil, one should be guided by the descriptions in GOST “Soils. Classification".
According to this standard, the soil is divided into 5 groups:
- excessively heaving;
- strongly heaving;
- medium-heavy;
- slightly heaving;
- non-porous (conditionally).
For all groups, except for the last option, measures must be taken to protect the shallow strip foundation on heaving soils. Conditionally non-heaving soils include coarse-grained types, sand of coarse and medium fractions. These materials filter moisture well, so that it goes to the lower layers. At the same time, the location level ground water must be below the foundation depth.
Heaving soils do not pass water well, so precipitation easily accumulates in the layer. These types include clay, loam, sandy loam. Also, heaving should be disposed of in fine sandy and dusty soils. On the latter, construction is not recommended; it is better to perform a complete replacement of the soil with coarse sand.
Scope of MZLF
A shallow strip foundation is used for small buildings without a basement. This option will reduce the financial and labor costs for the construction of the tape under the house by reducing the volume of concrete and the amount of reinforcement. At the same time, the strength characteristics of the soils must be sufficient to withstand the building. You must first perform a calculation.

Scheme of the MZLF device.
This type of foundation is also used when water occurs in the ground at a distance of 1.5 m or more. In this case, it is impossible to use a deep-laid tape without costly dewatering measures.
MZLF is most often arranged for buildings made of relatively light materials:
- wood;
- wooden panels (frame houses);
- lightweight concrete (foam concrete, aerated concrete, etc.).
The depth of the tape can be different. Most often, it is assigned in the range of 70 - 100 cm. The exact value depends on the strength characteristics of the soil, the number of storeys of the building and the materials used for construction. In this case, the location of the level of ground moisture should be 50 cm below the level of the base of the foundation. Otherwise, there is a possibility of structural damage.
How to protect MZLF from heaving on clay soils
The most common way to deal with heaving soils is to lay the base of the foundation below the freezing mark (determined by). But in many regions, this mark is too deep, the cost of construction is greatly increased.

A set of measures to protect the MZLF from heaving.
When constructing a shallow strip foundation on heaving clay soils, protective measures are taken in combination. In this case, paragraph 11 is guided. It is important to simultaneously prevent exposure to cold and moisture. MZLF protection is performed in the following order:
- from non-porous material. It is assigned a thickness of 30-50 cm. It is made from coarse or medium sand. Sand is also used to fill the sinuses on the sides of the foundation. This approach will eliminate the effect of heaving soils on the side surface of the structure. A layer of geotextile is placed under the sand cushion to prevent silting.
- at the level of the base of the foundation. The pipe is laid at a distance of no more than 1 m from the side wall of the tape. The depth is assigned 20-30 cm below the base of the foundation. The slope of the drainage pipe depends on the diameter of its section.
- and the vertical surface of the strip foundation. The function of insulation for heat and moisture can be taken over by extruded polystyrene foam (for example, polystyrene foam). The material is fixed to the entire height of the tape, including the base. It is forbidden to use cheaper foam plastic instead of foam plastic. It has much less resources.
- Insulated blind area. This element also performs the function of waterproofing, preventing atmospheric moisture from entering the foundation. By laying penoplex under the outer layer of the blind area, it will be possible to prevent freezing of the soil in the immediate vicinity of the building.
- Storm sewer. When landscaping the territory, it is important to provide for the effective removal of excess moisture from the site.

Required slope drainage pipes depending on diameter.
The construction of the foundation on clay heaving soil is carried out in the summer. It is important to load the structure before the onset of cold weather. In case of a forced stop of construction, it is necessary to carry out a full range of measures for.
Alternatives
Shallow tape has a reduced bearing capacity. It is not recommended to use it under massive buildings. If you need to build a brick or concrete building on heaving soil, it is better to give preference to a shallow foundation slab.
Also, do not use MZLF when the groundwater level is located at a distance of less than 1.5 m from the soil surface. In this case, a non-buried slab is suitable for a brick or concrete house (including lightweight concrete). For frame or wooden house metal screw piles can be used.
A competent choice of the type of foundation and compliance with the technology of its construction will prevent the negative impact of heaving soils. It is important to perform all actions to protect the structure from cold and moisture.
Shallow foundation on heaving soils - the basis for building, which is laid at a shallow depth of soil, above its freezing layer. talking plain language, this is the foundation that is laid between the non-buried and buried foundation.
A shallow strip foundation on heaving soils today has found wide application in the construction of the private sector. Thanks to this technology, it was possible to create a solid foundation that will be optimally used for future building of the house. It should be noted that the design with laying the foundation of the strip foundation directly on the non-freezing layer of soil makes it possible to achieve high efficiency even at high loads per 1 running meter. foundation. Thereby this species foundation will be an ideal solution for the construction of brick 2-3 storey houses.
For example, in the Moscow Region, approximately 80% of soils are considered heaving. IN winter time the volume of heaving soils gradually begins to increase, raising the soil layer. When the foundation is located on this type of soil, with a lower base load than heaving forces, an asymmetric undermining of the foundation occurs, which will lead to deformation of the building or to its destruction.
Even when laying a foundation of expensive material to the depth of soil freezing, it does not give a 100% guarantee of the building's resistance to heaving forces, which act with a large tangential load on the side surface of the foundation. It is in this case that a shallow strip foundation on heaving soils is an ideal solution.
The main stages of the construction of a shallow foundation
Step by step:
- to begin with, it is necessary to perform marking, according to we will dig trenches with a depth of about 0.7-0.8 meters;
- using glassine or roofing paper, we perform waterproofing of the side parts of the trench;
- after that, the trench is filled with sand to a depth of 20 cm, on which we will lay a layer of waterproofing on top;
- proceed to the installation of formwork. To do this, we first assemble a wooden formwork, where we sheathe the inner walls with waterproofing material;
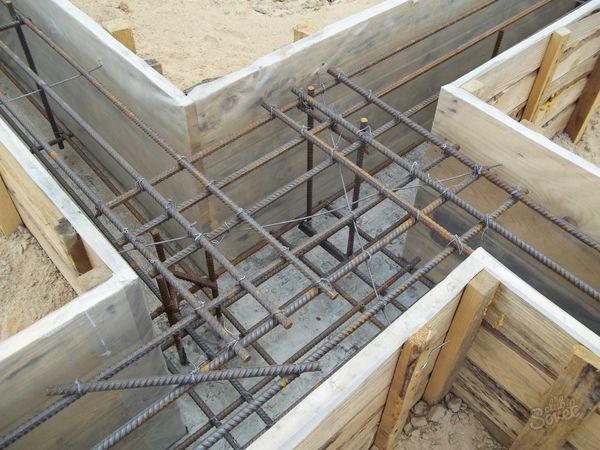
- at the bottom of the trench we line the 1st layer of reinforcement, which we fill with concrete;
- then we lay a 2-layer reinforcement on the raw concrete to the very top and pour it again with concrete to the end of the formwork. Pre-reinforcement should be tied with knitting wire.
Advantages of a shallow foundation
- availability;
- high efficiency;
- withstands high loads;
- allows you to create a solid foundation on heaving soils;
- savings on the consumption of concrete for formwork up to 50-80%;
- quick and easy installation;
- work on the construction of the foundation is reduced from 40 to 70% in time;
- versatility - the ability to use for pillows: sand, slag, crushed stone, etc.;
- high reliability and durability.
Among all existing types of supporting structures, it is confidently in the lead in terms of prevalence.
It has an optimal set of performance characteristics, provides sufficient bearing capacity with a relatively small consumption of building materials.
There are several design options with different technical characteristics that allow you to apply the type of foundation that is most suitable for the existing conditions.
The choice is always determined by the hydrogeological situation on the site and corresponds to the magnitude of the loads.
A conventional strip foundation is immersed in the ground to a depth below the freezing level. This type of foundation is called deep-seated. The belt rests on immovable and stable soil layers, which excludes impacts from below on the sole of the base.
Wherein, side surfaces tapes have a large area, which is affected by the forces of horizontal heaving. This creates a high danger for the base, since lateral influences can destroy the supporting structure and pose a threat to the building.
This is most dangerous for low-rise small buildings, private houses, the weight of which is not able to compensate for heaving loads.
There is a lightweight option - a shallow strip foundation (MZLF). It plunges into the ground to a relatively small one - from 0.5 to 1.5 m, which is higher than the level of soil freezing.
With this design, there is the possibility of the appearance of vertical heaving loads acting from below, but lateral effects are significantly reduced.
The design of the MZLF almost completely repeats the usual version, but adjusted for a smaller immersion depth. The bearing capacity of such a base is reduced and allows the construction of only relatively light low-rise buildings, mainly used for private residential buildings.
Advantages and disadvantages
The advantages of MZLF include:
- Small amount of earthworks.
- The consumption of building materials is significantly reduced.
- There is a possibility of independent construction.
- The financial costs are much lower than in the construction of a conventional foundation.
The disadvantages include:
- Reducing the bearing capacity of the tape.
- Prohibition on the construction of massive and heavy buildings. MZLF is intended only for low-rise and relatively light houses.
- There is a need for a thorough survey of the site.
What kind of soil is it used for?
Shallow tape is suitable for almost all types of soil, except for the most problematic, which include peatlands, wetlands.
Possible construction on the following types of soil:
- Dry sandy soils.
- Gravelly, rocky areas.
- Sandy loam, loam.
- Clay soils.
Each type of soil has its own technological features associated with the depth of immersion and the composition of the tape. So, for strongly heaving soils, the construction of prefabricated foundations is not recommended, especially from masonry materials (brick, cinder block, etc.).
Heaving loads are uneven and randomly distributed. In addition, they are unstable and are able to change their values, strengthening and weakening at different points that are not amenable to preliminary calculation.
Therefore, on problematic soils, a monolithic tape is needed that can withstand the resulting loads.
MZLF cannot be used on slopes, since weak contact with the ground will cause the building to slide.

What are heaving soils and why are they dangerous
Heaving is the process of increasing the volume of soil caused by the expansion of frozen water. Heaving soils contain enough moisture so that it can affect their condition in winter.
It is noteworthy that in Russia, most sites have this type of soil, which puts forward special requirements for construction technology.
The presence of moisture makes these soils unstable during the cold season. Water freezes, expands and begins to squeeze the soil up or in the direction of least resistance.
At the same time, the magnitude of the loads is proportional to the amount of moisture and at different points has its own values, which are constantly changing.

What types can be classified as heaving
Heaving soils are soils containing a large number of moisture, capable of absorbing and retaining it in itself.
These include:
- Clay soils. They have the greatest heaving, since clay does not let water through, but retains it well due to its porous structure. Because of this, clay patches never completely dry out, which is a major problem for builders.
- loams. They consist of clay (10-30%) and sand. They are able to retain water in smaller volumes than clays, which reduces the frost heaving indicators relative to the maximum values.
- sandy loam. The clay content does not exceed 10%, the rest of the composition is sand. The water absorption of such soil is relatively low and the degree of heaving is low.
Layered soils containing clay interlayers are also problematic with regard to heaving. ABOUT They do not retain water absorbed from the surface, forming soil aquifers.
They are unstable, periodically appear and disappear, which makes it difficult to preliminary.

How to protect MZLF from heaving
Protection against heaving is a layer of sand backfill. It is located between the bottom and walls of the trench and the concrete strip, cutting off the base from direct contact with the ground. The sandy layer freely passes moisture, as a result of which the soil masses adjacent to the tape are always dry and not prone to heaving.
The bottom layer, located directly under the base of the tape, is called the pillow.. It compensates for the loads that occur in the underlying soil layers and serves as the location of the drainage system, which removes excess water into special wells or nearby reservoirs.
Step by step installation instructions
The MZLF construction technology has been worked out by many years of practice and consists of several stages that are a continuation of each other. It is impossible to change the sequence of actions, as well as to neglect any operations.
Any “amateur activity” is extremely dangerous, creating the possibility of destroying the foundation and building.
Procedure:
- Site preparation and trenching.
- Backfilling of a sand cushion.
- Formwork installation.
- Armpoyas installation.
- Concrete pouring, curing.
- Waterproofing, backfilling of sinuses.
Let's take a closer look at these operations.

trench preparation
The topsoil is removed, the site is planned and leveled horizontally. Then the trench is marked with pegs and cords stretched between them.. All corner points and junctions of trench sections are marked.
According to the marking, a trench is dug to a predetermined depth. If the work was carried out with the involvement of equipment, all corners and intersections are manually aligned.
Then a layer of sand cushion is poured to the bottom of the trench. Its thickness is 20-40 cm. The higher the heaving index, the thicker the backfill layer should be. The material is carefully compacted to maximum compaction.
A layer of geotextile is laid on the surface, on top of which a double layer of horizontal is laid (roofing material coated with bituminous mastic).

Formwork installation
The formwork is assembled from edged boards. They should be straight and even, it is recommended to use planed material with the same thickness.. Boards are assembled into shields with a width slightly greater than the height of the tape.
There should not be any cracks or gaps; if they are found, they should be plugged with tow or wooden slats.
The shields are assembled on the surface, after which they are carefully lowered into the trench, aligned along the axes and strengthened from the outside with stops and vertical strips, and from the inside - by crossbars that determine the width of the tape.

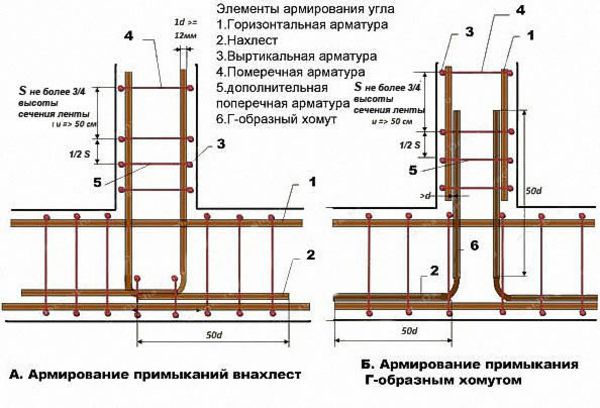
Reinforcement and knitting
The reinforcement is necessary to reinforce the tape and compensate for axial tensile forces. The tape is unstable in bending, and heaving loads manifest themselves in this way, so the creation of an armored belt is the most important step.
The main functions are performed by horizontal rods. They are placed at a depth of 2-5 cm from the concrete surface.. To support them in the required position until the moment of pouring, vertical reinforcement is used - clamps designed to fix the position of the rods as part of a spatial lattice.
Working rods have a thickness of 12-16 mm, auxiliary - 6-8 mm.
The frame is assembled by knitting with soft steel wire. Twisting is performed, formed by pieces of wire 25-30 cm long, folded in half. The wire wraps around the connection of the bars and twists 4-6 turns with help. special hook.
This method is simple and does not require the use of special equipment.
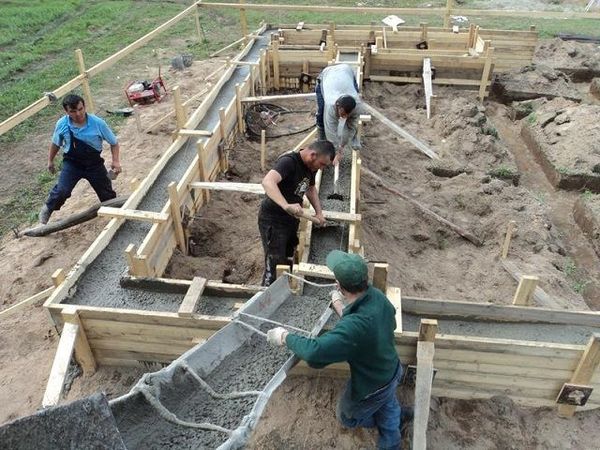
fill
Filling is done in one step. A break of more than a day is unacceptable, so it is necessary to think over and organize the process in such a way as to have time to fill in the entire tape at a time. It is recommended to use ready-mixed concrete delivered to the site in a mixer.
It is necessary to create a system of trays that feed material into the formwork . Pouring is carried out from different points in such a way that equal amounts of concrete are supplied. This will help ensure that the quality of the tape is uniform at all points, creating maximum strength and resistance to stress.
After that, the tape is covered with polyethylene and watered every 4 hours. After 3 for the watering mode changes - every 8 hours. This continues for another week, after which the formwork can be dismantled.
The final hardening of the tape occurs after 28 days.
NOTE!
It is impossible to reduce the curing time of concrete, this makes the tape less durable and reliable.
Final stages of work
After hardening, waterproofing and insulation are installed on the surface of the tape. The upper plane is insulated in the same way as the lower one - with a double layer of roofing material, fastened with bituminous mastic.
The side surfaces are covered with one of several types of waterproofing - impregnation, bituminous mastic or gluing materials.
The heat insulator is mounted on the inside and outside of the tape.
Waterproof insulation types are used:
- Penoplex.
- Styrofoam.
- Liquid Styrofoam.
- Foamed polyethylene, etc.
Installation of insulation must be continuous, without gaps and gaps. After performing these operations, the sinuses are backfilled (optimally - with gravel sand), then the blind area is poured from the outside.
Useful video
In this video you will be told about small tips for installing MZLF:
Conclusion
The creation of a shallow strip foundation on heaving soils is carried out in the usual way, only a thicker layer of sand backfill is created. It performs the tasks of cutting off heaving loads from the tape and drains the layers adjacent to the base.
All other actions practically do not differ from the generally accepted technology and are performed in accordance with the proven methodology.
In contact with
One of the most important tasks in the construction of almost any building is the choice of the appropriate type and foundation. When choosing a foundation, it is necessary to take into account the heaving and other properties of the soil. Fluffy soils expand and rise during freezing.
If you use a non-buried foundation on heaving soils, then this will save time, money and labor costs.
Because of this, the foundation and the structure itself can deform and collapse. To avoid these unpleasant moments, the foundation is built at a depth below the freezing level, however, during construction light building This option would be impractical and very expensive. In view of this, as an alternative, in most cases, a non-buried foundation is performed.
What can be an unburied foundation?
Having figured out how the installation of a shallow foundation on heaving soils is carried out, you can do this work yourself. During the installation process, all parts of the structure are combined into a single base. Thanks to him, the alignment of deformations and uniform distribution of the load along the entire perimeter of the non-buried foundation on heaving soils will be ensured. The foundation can be tape and columnar. The tape base is a single frame. In the case of a columnar support, the structural elements are fixed using steel beams or monolithic grillages.
When constructing a shallow foundation on heaving soils, there is a possibility of a slight rise in the base.

Deviations should not exceed the maximum allowable design values. They are determined according to the type of building and the building materials used. It is very important to ensure such rigidity of a non-buried foundation on heaving soils so that it can normally endure the deformations that occur during the freezing of the soil.
If the device of a non-buried foundation on heaving soils is carried out in accordance with the technology, then the building on such a support will be operated no worse than a building on a buried foundation.
The use of a non-buried foundation on heaving soils can reduce monetary, time and labor costs.
The foundation is built using the following tools:
- building thread;
- level;
- perforator;
- shovels;
- construction wheelbarrow;
- concrete mixers;
- hammer;
- measuring tape.
Back to index
Preparation for the device of a columnar non-buried base
Before you start installing a columnar foundation, you need to prepare construction site and make markup. Clear the construction site of debris. It is important that it has a slight slope for the flow of melt and rainwater. The slope can be in any direction except north. After preliminary preparation of the site, marking is carried out. For this you will need the following:

- linen cord;
- roulette;
- triangle with a right angle;
- pegs 0.5 m long;
- level.
Level the site and remove the vegetation layer of soil. The finished base should be 10 cm wider than the building. Start marking from the inner contour. It is necessary to set the first corner of the building in it and hammer in a peg. Take a triangle and determine the size of the outer side of the base. On the one hand, this size should be equal to the length of the transverse wall, on the other - to the longitudinal wall. Where the axes will intersect, hammer in the 2nd and 3rd pegs. By the same principle, measure all other corners of the structure.
After that, you will need to install a rundown. At this stage, posts are installed near the driven pegs, and boards are fixed on them. They need to be fixed at the floor level of the future building, but not higher than 150 cm from the ground level.
Don't forget about axial dimensions. They need to be applied to the upper edge of the cast-off, hammer in nails and pull the cord. Pull the linen cord over the driven pegs. Do this on all sides of the future building.
Back to index
How to fill a columnar foundation?
Pillar foundations, among other things, have become very popular due to their high strength and ease of construction. In addition to these advantages, the columnar foundation has its drawbacks. They should not be forgotten when constructing the foundation. It is impossible for the area to have large elevation differences and a high level of groundwater. Construction on moving soils is acceptable, but if possible, it is recommended to make a strip foundation. Another advantage columnar base is relatively low cost.
This type of foundation consists of many supports that are installed at the most important points of the structure, namely:

- under the bearing elements;
- at the intersection of the walls;
- at the corners of the building.
The foundation is built in strict accordance with the plan, drawings and project documentation future building. Only if these important conditions are met, strong columnar foundations are obtained.
In the process of choosing supports, be guided by the expected load on the foundation. To do this, you will need to know the approximate weight of the finished building, the number of people staying inside at the same time, the presence of heavy equipment and furniture, etc. Based on these factors, the material for the manufacture of pillars and their number are selected. Column Foundation need to fill before frost. It is forbidden to leave it unloaded during cold weather, because. by spring, it will deform, and you will be forced to redo everything.
The foundation is built using the following materials:

- supports (made of reinforced concrete, brick or concrete);
- formwork boards;
- fittings;
- cement;
- gravel;
- sand.
The formwork is made from a board 2 cm thick. It will be light in weight and will come out cheaper when compared with chipboard and metal plates. Collect shields from the boards. Collect boxes from them. Install the finished boxes in a previously prepared hole in the ground. These holes are created in the places where the support posts will be installed. Moisten the inside of the boxes with water. There should be enough water. It will prevent the absorption of moisture from the concrete and will greatly facilitate the dismantling of the formwork after the pour has dried.
The columnar foundation is reinforced with bars with a diameter of 14 mm. They must be placed in the box so that their edges do not reach the box wall by about 0.5 cm. The longitudinal reinforcement should have a diameter of 6 mm. It must be welded to horizontal bars in increments of about 30-40 cm. Longitudinal bars should be 50 cm longer than the box. In the future, a grillage frame will be attached to them. After this frame is ready, excess reinforcement can be easily removed.
Finally, the concrete solution is poured. It must be poured in layers 25-40 cm thick and must be treated with a vibrator to prevent the formation of air pockets. This is very important, because air pockets will significantly weaken the overall strength of the foundation. Fill in 1 time if possible. Pour a layer of concrete, break it with a vibrator and so on until the end. If you take a break even for 1 day, then a seam will appear at the junction of the layers, reducing the bearing capacity of the base.
Heaving soils have a number of features. In particular, the process of soil heaving begins during the period of freezing of the earth's thickness. Most often occurs on clay, loamy and fine sandy soils, where the influence of groundwater is strong. When the soil freezes to a certain depth, the water that frost reaches increases in volume and lifts the top layer. Soils are called heaving because of their ability to swell, deform the earth in winter, breaking or breaking the structures standing on them, including rather heavy foundations. It is necessary to build on such soils taking into account their destructive influence.
Heaving soils and features of construction on them
This is especially true for regions with high level underground water content and too cold winters. When the soil freezes to a great depth, a bulk cushion is not always enough. On such heaving soils, construction is used on a shallow foundation. Large construction corporations put structures on a reinforced concrete slab base. In private construction, it makes sense to lay a sand-gravel cushion (or bedding) from a material that is not subject to heaving under the foundation of the house, which makes it possible to keep the skeleton from moving during the period of soil freezing. There are two options for laying the foundation on heaving soils with your own hands:
- Shallow-deepened on leveling bedding;
- Shallow, on a pillow from a mixture of loose, not subject to deformation during heaving materials.
Technologies make it possible to supplement the laying of an airbag for a building under construction with polymer materials for insulation, which reliably protect the ground under the building.
On heaving soils, depending on their classification, it is possible to install a structure for construction small houses, cottages, outbuildings and other structures on a strip foundation, you can do it yourself. The only thing that owners of a site located on heaving soils should pay attention to is the warming of the earth around the house and the creation of a warm microclimate under the base of the house.
It is worth considering that the material for the walls of the house should not be heavy. The tape laying option is often used to save materials using reinforcement.
Base selection
If it already happened that your site is located near a reservoir or in a region with a very cold winter, then when designing buildings, consider which option for laying the foundation would be preferable in terms of time and financial costs. To level the negative impact of natural phenomena, choose one of the options for laying the base:
- On the airbag with the use of bulk materials;
- On a cushion of crushed stone and sand with an admixture of expanded clay and the creation of a drainage system that allows you to make a high-quality drainage from the structure;
- Tape version with reinforcement and an increase in the level of rigidity of the house with a reinforcing belt;
- Tape option with the installation of pillars or piles (columnar type);
- Slotted construction (when concrete is poured into trenches directly into the ground without the use of formwork).
Before proceeding with the implementation, study the geodetic map, prepare a project, bring in the building materials necessary for the construction of the building, and feel free to start realizing your dream. You will have to do it yourself, so you will have to use more physical labor, less technology. The time for shrinkage of this type of foundation should not exceed one season: the construction of a house for a shallow strip base does not involve shrinkage.
Important! It is required to lay the foundation to a depth below the freezing level so that the building does not crack in the future. For pouring, use high-strength concrete of the highest grade, which has frost resistance and water resistance.
Device
When building on heaving soils, the foundation laying technology is as follows:
- markup;
- digging trenches;
- pillow laying;
- if necessary, laying a drainage pipe;
- blind area with polymer insulation;
- waterproofing;
- installation of reinforcing mesh;
- pouring concrete with or without formwork or laying blocks;
- foundation insulation.
As you can see, there is nothing complicated. You can do this with your own hands, without resorting to outside help.
The first thing to do and what the final result of your work will depend on is to properly mark the future house, trenches must be dug under all load-bearing walls, which will be subjected to maximum load. The width of the trench should be greater than the thickness of the planned walls to reduce the load.
At the corners of the future structure and along the load-bearing walls, pegs should be hammered and a plan outlined. At the next stage, install a blind area with a deviation from the pegs by several tens of centimeters and wrap them around the perimeter with a rope, which will act as a ruler.
Laying work
First you need to dig trenches under tape bookmark. The walls of the moat should be as smooth as possible in order to reduce the consumption of building material. If possible, use the services of a mini-bulldozer. After the technique, it will be enough to level the walls and proceed to the next step.
If not, then you will have to dig trenches with your own hands. The depth of the trench depends on the level of soil freezing in the region of residence, it should be below this line. In central Russia, the freezing level ranges from 50 cm to 1.5 m. In cold regions, it reaches 2 m. Geotextiles should be laid in prepared trenches to avoid adverse effects on the drainage system, consisting of one or more pipes. Geotextiles will protect pipes from corrosion.
Sand 20-30 cm thick is poured to the bottom. To give density, it is better to fill it with water and carefully compact it. You should not lay sand if its share in the heaving soils of your region is more than half.
We make a drainage system. As a drainage system, cast-iron or steel pipes with a large cross section are often used, which are laid parallel to each other in prepared trenches with a slight slope and outlet to the drain pit.
For the manufacture of pillows, sand and crushed stone of the required fraction are used (preferably gravel). In some cases, expanded clay materials are added to give the structure a fortress. The pillow can be made by mixing materials, but it is better to lay out in layers. It is desirable to fill the layers with water and tamp in order to avoid porosity and give the pillow strength. A tightly packed pillow will strengthen the bearing capacity of the foundation.
Waterproofing
A layer of waterproofing must be applied to the pillow. It can be an ordinary dense polyethylene film, pieces of old roofing material or other bitumen-polymer material. Waterproofing materials must be laid so that the edges extend beyond the formwork.
When the airbag is laid, proceed to the installation of the formwork. Formwork is being prepared from improvised materials. It is better to take boards with a perfectly smooth one side so that the walls initially turn out to be even, and it does not take much effort to finish them. The foundation will protrude above the ground, forming the basement. That is why the formwork must be above ground level by the distance that you plan to use under the height of the plinth.
First, the inner part of the formwork is built with an emphasis. Then the outer part is prepared, which is reinforced from the outside with spacers. Between the inner and outer parts of the formwork, it is advisable to nail the bar so that during the pouring of concrete, the structure cannot expand and go to the side.
Reinforcement
In order for the concrete mixture to acquire the necessary strength, it should be based on a mesh of reinforcement. The mesh is woven from reinforcement of 12 and 20 diameters and is interconnected with ordinary wire. Each row should have at least 4-6 rebars. Reviews about such weaving are positive, because you can do it yourself. The mesh is knitted easily, and the concrete foundation with the use of reinforcement lasts much longer, since such a combined option is less susceptible to negative impact temperature difference.
For corner fastenings, you will need to additionally use reinforcing corners. When installing the grid on the bottom of the trench, it is advisable to use stands made of plastic pipes. This is done in order not to damage the waterproofing layer with the sharp ends of the reinforcement.
The finished mesh should be laid carefully, weaving it into a single structure with the formation of a monolithic rigid frame. Reinforcement is one of the important tasks, since, in fact, it is a skeleton of the foundation.
Insulation of the base of the house. In very cold European countries It was experimentally established that insulation plays an important role in the construction of houses on heaving soils. At modern technologies for the manufacture of building materials from expanded polystyrene, it makes no sense to prepare additional insulation systems. Expanded polystyrene is a very high-quality insulation, it is not afraid of getting wet, its service life is almost unlimited. Reviews of home owners with such styling speak for themselves. It can be used instead of formwork, it can be additionally laid in the form of a blind area around the building. Such a blind area serves reliable protection from the penetration of cold under the house.
The earth tends to absorb energy, and under a layer of insulation, the temperature situation under the house remains stable even in a very cold winter, there is practically no heat loss. The house itself becomes a source of heat.
When laying the blind area, you need to decorate the material from above. Expanded polystyrene is not intended for walking. Therefore, ceramic tiles should be laid over the entire area of \u200b\u200bthe blind area or concreted with a thin layer. To prevent the house from getting wet, it is better to do it with a slope.
It is better to lay the blind area at a distance of at least 1 meter along the perimeter of the entire building.
Pouring concrete mix
The final stage of laying the foundation is pouring concrete into the prepared tapes. The concrete mixture is prepared immediately before the start of work. It is made from sand and cement. In some cases, crushed sand of the finest fraction is added. For construction on heaving soils, it is better to take cement of a high grade of strength. Saving in this case is unsafe for life.
During the pouring process, the mixture must be vibrated with a stick or a special tool in order to drive out excess air bubbles. This will give the concrete extra strength.
The concrete mixture must be carefully compacted. The top of the concrete should be as flat as possible. You can achieve a flat surface with a stretched rope or level - a spirit level. The smoother the concrete layer is laid, the easier it will be to lay on the basement. construction material for extrusion walls.
The columnar base of the house is the most reliable if you want to save money. Instead of reinforcement, reinforced concrete pillars are installed at the corners and along the perimeter of the trench. Such foundations can be laid where it is not possible to use concrete on a monolithic basis, for example, in wetlands or on land with a high content of underground groundwater. Do such reinforced concrete structures you can do it yourself.
Shallow strip foundation on heaving soils
Features of heaving soils and the rules for arranging a strip foundation. Description of works on laying a shallow foundation.